
Create an Assignment
Create a new assignment for each activity that requires students to submit individual or group work, such as essays, projects, or files for grading. Unlike discussions, which are designed for interaction and peer engagement, assignments act as drop boxes where students submit their work privately.
When setting up an assignment, you can build it directly in the course, link it to the gradebook, and organize it into the appropriate category. This keeps your course structured and makes managing submissions and grades more efficient.
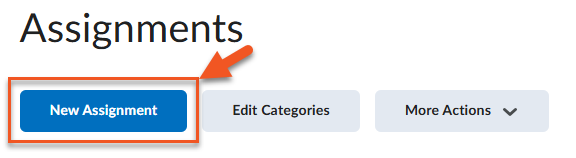
- Begin by navigating to Activities > Assignments.
- Click on New Assignment.
- Enter a Title and click Grade Out Of (for graded assignments).
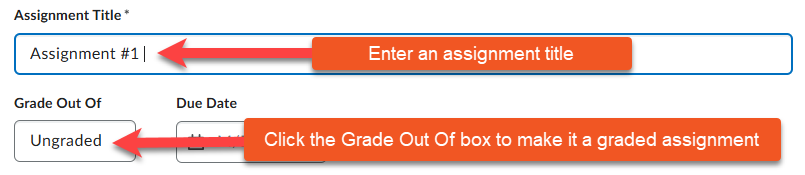
- Enter points. To add or remove the assignment from the gradebook, click In Grade Book and select the appropriate option.
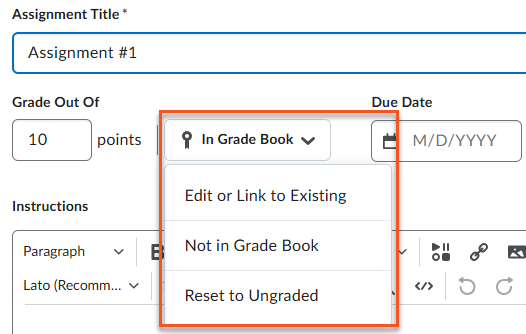
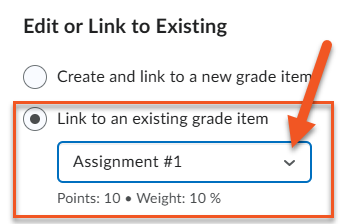
- Edit or Link to Existing: Creates new grade item in gradebook linked to assignment or links assignment to existing grade item.
- Not in Grade Book: Keeps assignment out of gradebook, but allows for grading and feedback — used for formative grading and feedback where score doesn’t count toward final grade.
- Reset to Ungraded: Used to reset assignment to ungraded. Used for formative assessments where feedback in priority.
- If you choose Edit or Link to Existing a new window pops up. By selecting the first button, Create and link to a new grade item, you create a new grade item in the gradebook that is linked to the assignment. NOTE: This option should only be used if you haven’t completed your gradebook setup.
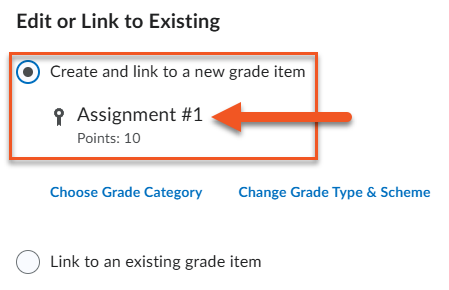
If you have created your gradebook prior to the assignment (recommended), select the second button, Link to an existing grade item, to link to your pre-created grade item in the gradebook.
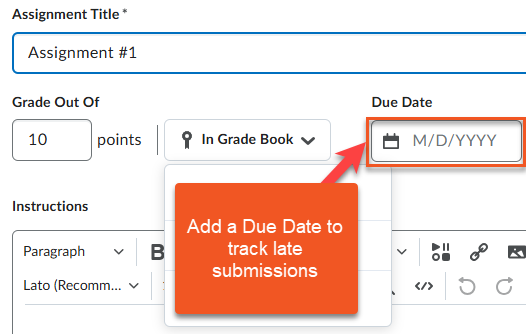
- Add a Due Date.
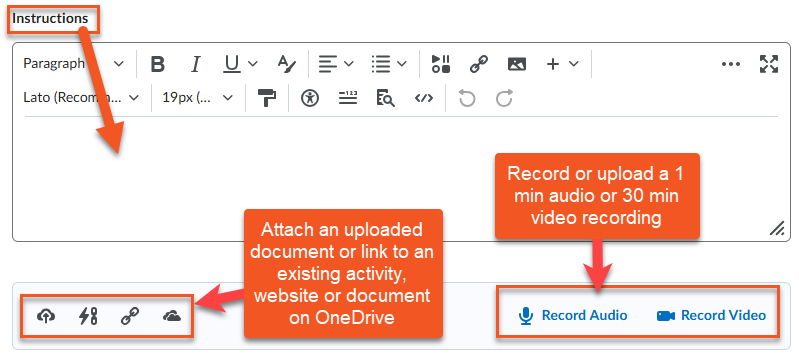
- Enter Instructions and upload attachments, links or recordings.
- Add Dates & Conditions, enter Submission & Completion parameters, and select Evaluation & Feedback settings. See Setting Assignment Parameters for more details.

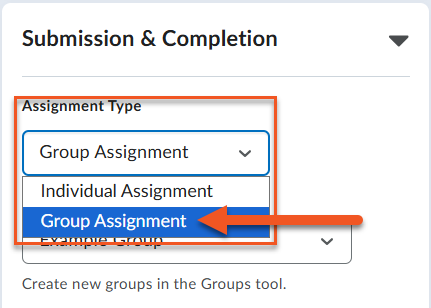
Creating a group assignment begins with first creating groups using the Groups tool. See the page on Groups to learn how to create a Group Category. Once your groups have been created, you can choose to make an assignment an individual assignment or a group assignment.
- Individual assignments provide each student with a private submission area where they can access individualized feedback and their personal grade.
- Group assignments provide students who are members of the same group a shared submission area where they can see any submission that has been uploaded by other group members. This setup also provides instructors a way to assign the same grade an provide the same feedback to all members of the group at once.
NOTE: once students have submitted to the assignment, you will not be able to edit or change the assignment type (e.g., you cannot switch it back to individual from group).
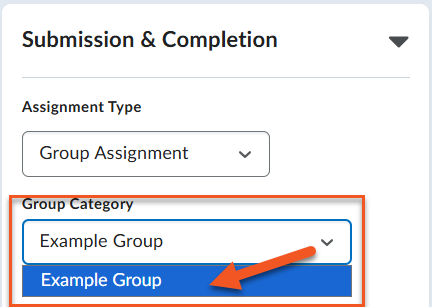
To create a group assignment, follow the first 7 steps in how to Create a Basic Assignment, then under the Submission & Completion options choose Group Assignment and the appropriate Group Category. Again, see how to Create a Group Category to learn more.
When creating a pass/fail assignment, you can choose to include it in the final grade (link it to your gradebook) or not. If you choose to include it, it must be linked to a Selectbox grade item, which is a type of grade item you create in the Manage Grades area. NOTE: You cannot link a quiz or a discussion to a pass/fail Selectbox item — only assignments.
Overview Creating Pass/Fail Grade Items and Assignments
Setting Assignment Parameters
The assignment edit window includes 3 widgets on the right side that can be collapsed and expanded; each widget contains settings that can be adjusted in order to tailor an assignment to your needs. See the information in the tabs below to learn more about the settings found in each widget.
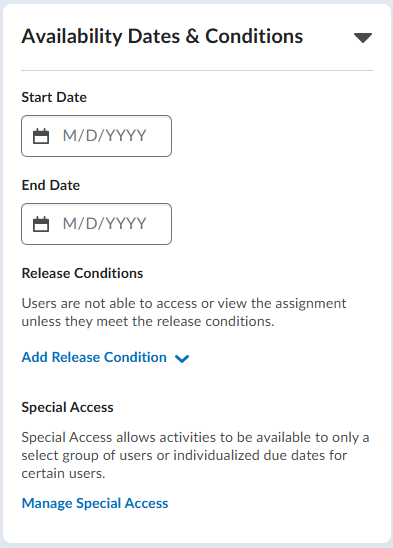
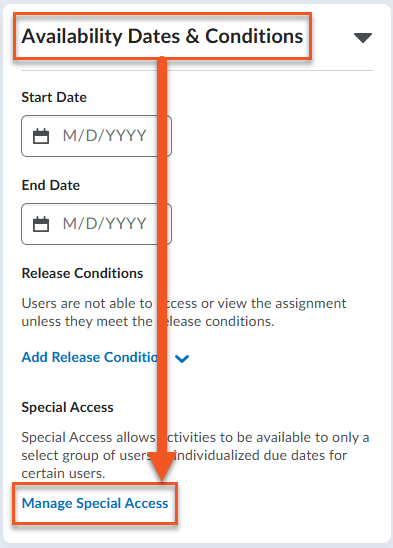
You can set date restrictions for your assignments, as well as add release conditions and special access for specific students when needed.
Start and End Dates: Start and end dates automate when students can access an assignment, so you don’t have to manually toggle the visible/hidden icon. If you set a Start Date and time, students won’t be able to open the assignment until that date and time. If no Start Date is set, the assignment is available as soon as it’s created and made visible.
Due Dates: Due dates control whether a student submission is flagged as overdue. It’s not required to have a due date on an assignment, it’s simply a way to track late submissions.
Release Conditions: Release conditions let you control when students can access an assignment or other course items based on specific criteria. For example, you could make an assignment available only after a student has viewed a particular module, completed a quiz, or achieved a minimum score on a previous activity.
Special Access: This tool allows you to accommodate students who require access outside of the assignment’s set parameters (e.g., earlier or later access, extended due date, additional attempts or time allotted). You can allow certain students to have Special Access to an assignment or only students with Special Access to access the assignment. The first case is useful if you need to provide accommodations, the second option is best used for remedial assignments.
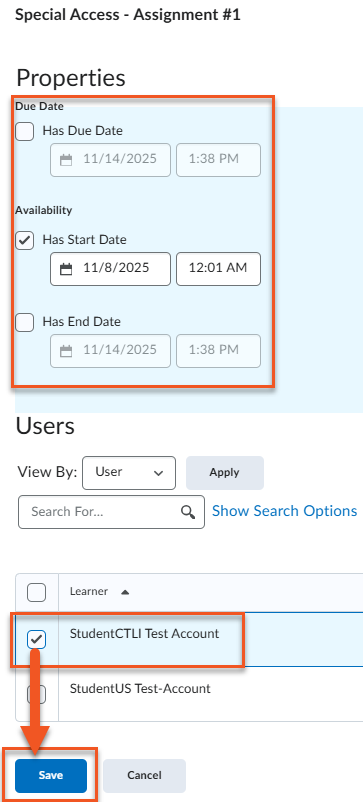
- From the Availability Dates & Conditions menu click Manage Special Access.
- From the Manage Special Access window, choose the first button to allow specific students special access. Choose the second button to allow access to ONLY students with special access.
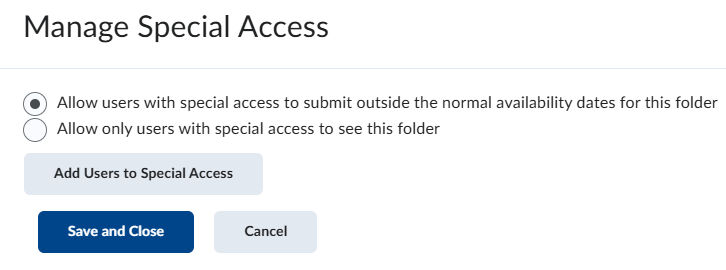
- Adjust the dates and check the box next to the student with accommodations. Click Save.
Submission & Completion options let you control how students submit their work to an assignment. *NOTE: This is also where you can choose the Assignment Type — Individual vs. Group. For group assignments, you must first create groups using the groups tool.
There are four submission types available.
- File submission: Students upload a file (e.g., PDF, Word Document, Images) to the assignment.
- File or text submission: Students upload a file OR enter text into the text submission field to submit to the assignment.
- Text submission: Students enter text into a text field. This type is good for assignments that require students to submit a link to a video or a website portfolio or blog.
- On paper submission: Students don’t upload or enter anything to the assignment in Brightspace, but this type allows you to provide students with a grade and feedback.
- Observed in person: Again, students don’t upload or enter anything as a submission to the assignment, but you are able to provide a grade and feedback for things like presentations.


Under Evaluation & Feedback you have the opportunity to:
- Add an existing or create a new rubric. See the page on rubrics to learn more.
- Manage Learning Objectives.
- Make annotation tools available to add feedback directly to uploaded documents by highlighting, drawing, and commenting (this is available for file submissions only).
- Hide student names for anonymous marking.
- Select evaluators.