
Gradebook Setup
The Setup Wizard guides how grades are calculated and displayed in your course. You will use the Setup Wizard to choose your grading system, calculation options, and how students will view their grades. These settings apply to the entire gradebook and should be in place before creating grade categories and grade items. Once you finish with Setup Wizard, you are ready to begin building your gradebook. If you are using a weighted grading system, you will build your gradebook by assigning weights to categories and items so the total equals 100%. *NOTE: Most courses at NIC use a weighted grading system.
Before you begin building your gradebook, use the Grades Setup Wizard to establish the overall parameters for your course gradebook, such as how grades are calculated, displayed, and released to students. The Setup Wizard involves 7 steps.
- Select Start and choose Grading System (Weighted, Points or Formula): Most courses at NIC use a weighted grading system (e.g., course is out of 100%).
- Final Grade Released: Choose Adjusted Final Grade. This allows you to adjust final grades if needed, and it is the column in the gradebook that is synced with Student Information Services (SIS), which is important if you are exporting final grades to SIS directly from Brightspace.
- Grade Calculations: Choose from one of two options.
- Drop Ungraded Items: This option exempts students from any items that are not given a grade. *NOTE: if you choose this option, you will need to enter zeros for incomplete assessments that are counted toward the final grade.
- Treat ungraded items as 0: This option automatically assigns a zero to any incomplete assessments.
- Choose Default Grade Scheme: Select the appropriate grade scheme (most NIC courses use Grade Scale 1).
- Managing View Display Options: The default setting is 2 decimal places.
- Student View Display Options: Select the grade details you’d like displayed to your students. It’s recommended to show Points grade, Weighted grade and Grade scheme symbol and to leave Display final grade calculation to users unchecked.
- Grades Setup Summary: Review your settings and select Finish to save.
Brightspace: Overview of Grades Setup Wizard
Watch the following 7:33 minute video to see how the Grades Setup Wizard works.
When you’re ready to begin adding gradebook items and categories to your Brightspace gradebook, a good place to start is with your Course Outline. The goal is to have your Brightspace gradebook mirror the course evaluation structure you’ve posted in your Course Outline. Follow the steps below to begin adding grade items and categories to your gradebook.
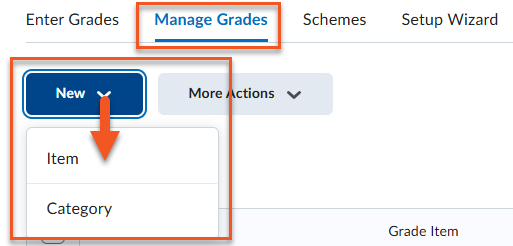
- Navigate to Progress > Grades > Manage Grades.
- Create a new grade item or category by clicking on New > Item (or Category)
- Give your new grade item both a long name and a short name. (*NOTE: the short name comes in handy when viewing grades in Spreadsheet View as there is a limited amount of space in each cell)
- Next, add the points and the weight. (*NOTE: for grade categories you will only assign the weight. For grade items, number of points can differ from the weight. For example, if you have a quiz out of 20 points that counts towards 5% of your students’ final grade, the points would be 20 but the weight would be 5)
- Select Percentage from the Grade Scheme drop down menu (this is what the student’s will see when they view their grades — if you leave it as NIC GRADE SCALE 1, students will only see their letter grade.
- Add an existing rubric if you have one or create a new one using the Rubrics tool.
- Select your Display Options for both the Student View and the Managing View. It’s recommended that you show students their Points grade, Weighted grade and the Grade scheme symbol.
- Click Save and Close if you’re finished or Save and New if you need to create more grade items.
*NOTE: The ‘Final Calculated Grade’ must sum to 100%. If the sum is over or under 100%, you will notice an error flagged near the top of the screen.
Brightspace: Set Up a Weighted Grade Book
Watch the following 12:15 minute video to see how to set up a weighted grade book.

Grade Categories
Grade Categories allow you to organize related grade items. This is important in weighted grade books, as you can decide what percentage of the final grade categories are worth (e.g., quizzes may be worth 20% of the final grade). You have the option to distribute the weights of the grade items within the category in one of three ways: manually, by points or evenly; however, the total sum of the category must total 100%. You can also choose to drop items based on points scoring the highest or lowest in that category.
Grade Items
Grade Items represent all the work that you want to evaluate in a course. These can be learning activities like quizzes, discussions and assignments, or they can be offline items like presentations. Each activity has a separate grade item (e.g., Quiz 1, Quiz 2, etc.). You have a choice of 6 types of grade items to create (Numeric, Select box, Pass/Fail, Formula, Calculated and Text). Most of the time you will select ‘Numeric’. Open the accordion below to read more about grade item types.
Linking grade items to assessments ensures that grades entered on an assignment, quiz, or discussion are automatically transferred to the gradebook. When you associate a grade item with an assessment, Brightspace connects the activity directly to the appropriate column in Enter Grades, reducing manual entry and minimizing errors. This also keeps your gradebook organized and ensures the item settings (such as points and weight) align with how the assessment is graded. To link a grade item to an assessment, you must first create the assessment (e.g., Assignment, Quiz, or Discussion).
Brightspace: Connecting Assessments to Grade Items
Watch the video below to learn how you can associate a grade item with and assessment.