
Create and Edit a Quiz
Quizzes can be used to support student learning, as part of their overall evaluation or with little or no overall final grade value. They are used to engage learners interactively, offering immediate feedback and personalized pacing, which in turn fosters deep comprehension and convenient, flexible study. As an instructor, you will also gain insights into your students’ performance, enabling data-driven enhancements.
You can find the Quizzes tool under the Activities menu. This tool lets you build online quizzes that can be graded automatically or reviewed manually within Brightspace. It also includes the Question Library which allows you to organize and reuse your questions across other tools, such as Self-Assessments and Surveys.
The Question Library is a central location where you can create, organize, and manage all your quiz questions. It’s accessible from Quizzes, Self-Assessments, and Surveys, and works much like a file manager, but for questions. It’s best to build your questions in the Question Library first. This keeps them safely stored, allows you to reuse them across activities, and prevents data loss if a quiz is deleted. You can also import publisher or external questions here and edit them before making them available to students. If you didn’t create your questions in the Question Library you can always copy them back to the Question Library.
Creating New Questions
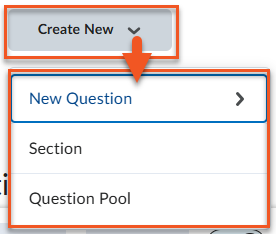
- Once in the Question Library, click the New Button.
- Choose Section and give it a name (e.g., Mid-term). Click Save.
*NOTE: Sections group related questions, making it easier to organize and reuse them when building quizzes. You can also shuffle questions within a section so each learner sees them in a different order.
- Select the Section you just created and click New.
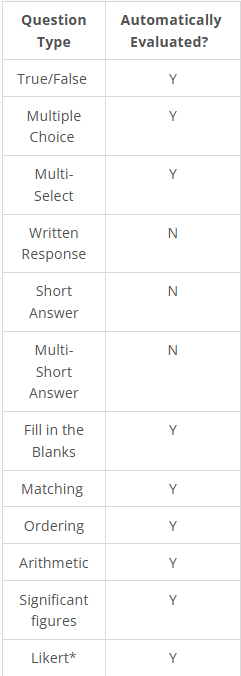
- Choose the Question type. Click to view what question types that are automatically evaluated.
- Add the relevant question text, including any material from the HTML bar.
- Choose the points value for the question and the difficulty level for the question.
- Click Save or Save and New (this allows you to immediately add more questions).
Importing Existing Questions
- Once in the Question Library, click the Import Button and either select Upload a File or Browse Existing Questions.
- Brightspace only supports the upload of formatted text files (CSV) or IMS QTI compliant course packages (ZIP). Algonquin College has created a Quiz Question Generator that provides an easy way to create a collection of questions that can be imported into Brightspace.
- Browse Existing Questions allows you to essentially copy questions from existing course quizzes into the Question Library. Watch the video below to learn how to copy existing quiz questions back into the library.
Quizzes can include a variety of question types such as: multiple-choice, true/false, short answer and essay prompts. You can customize quizzes to fit your specific needs by setting time limits, adding release conditions, randomizing questions, adding hints and more. To begin creating a quiz follow the steps below.
Create a New Quiz
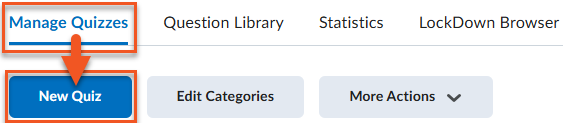
- Navigate to Activities > Quizzes.
- Click New Quiz.
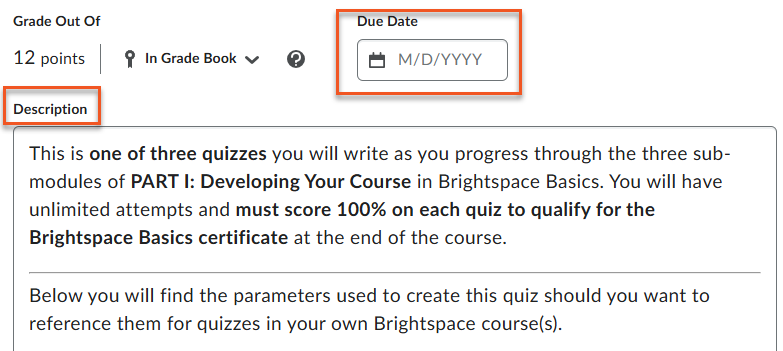
- Title the quiz and choose whether or not you want to add it to the gradebook. If the quiz in Not in Grade Book the total points will reflect total points of questions. If the quiz is In Grade Book, the total points will reflect the maximum points of the associated grade item.
- Add a Due Date and a Description (Instructions) for the Quiz.
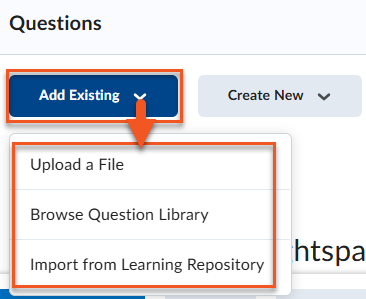
- Under Questions, click Add Existing (if you’ve already created questions in the Question Library) and choose the appropriate option OR click Create New if you’re creating a question that doesn’t already exist within the Question Library.
*NOTE: A Question Pool allows you to choose a select number of questions from your repository. This feature is nice as it allows you to create unique quizzes that are different for each student.
- Once you’ve populated your Quiz with questions, you can now add restriction settings (e.g., ‘Availability Dates & Conditions’, ‘Timing & Display’, ‘Attempts & Completion’ and ‘Evaluation & Feedback’). See the tabs below for more information.
Setting Quiz Restrictions
The quiz edit window includes 4 widgets on the right side that can be collapsed and expanded; each widget contains settings that can be adjusted in order to tailor a quiz to your needs. See the information in the tabs below to learn more about the settings found in each widget.
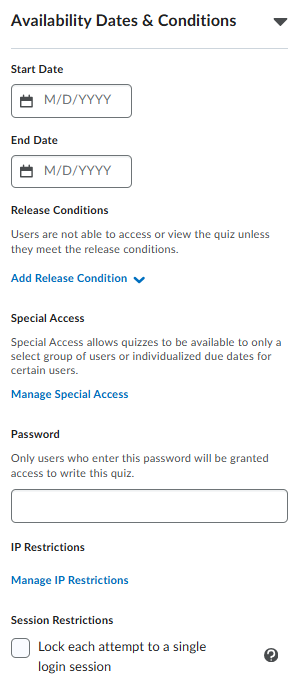
You can set date restrictions for your quizzes as well as add release conditions and special access for specific students when needed.
- Start and End Dates: Start and end dates automate when students can access an assignment, so you don’t have to manually toggle the visible/hidden icon. If you set a Start Date and time, students won’t be able to open the assignment until that date and time. If no Start Date is set, the assignment is available as soon as it’s created and made visible.
- Due Dates: Due dates control whether a student submission is flagged as overdue. It’s not required to have a due date on an assignment, it’s simply a way to track late submissions.
- Release Conditions: Release conditions let you control when students can access an assignment or other course items based on specific criteria. For example, you could make an assignment available only after a student has viewed a particular module, completed a quiz, or achieved a minimum score on a previous activity.
- Special Access: This tool allows you to accommodate students who require access outside of the assignment’s set parameters (e.g., earlier or later access, extended due date, additional attempts or time allotted). You can allow certain students to have Special Access to an assignment or only students with Special Access to access the assignment. The first case is useful if you need to provide accommodations, the second option is best used for remedial assignments. For more detailed instructions, see the accordion titled Provide Special Access to a Quiz.
- Password: You can add a password requirement so that students need to enter a password prior to accessing the quiz.
- IP Restrictions: You can set it so that only learners coming from IP addresses that meet the defined restrictions can write the quiz.
- Session Restrictions: You can set it so that each attempt is locked to a single login session.
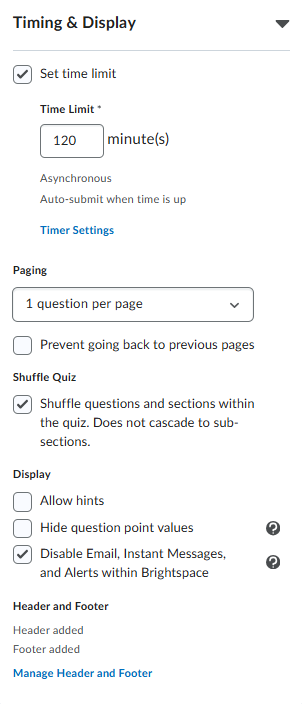
Timing & Display options let you control how students interact with your quiz (time limit, paging options, question shuffle, display options).
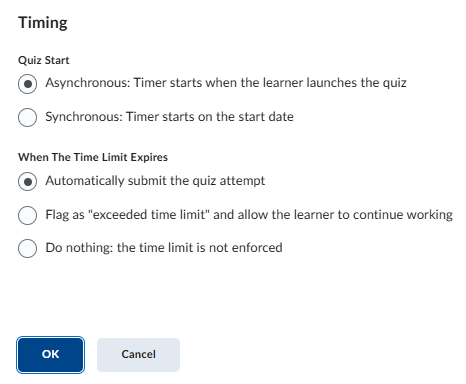
- Set time limit: You can set the time limit in minutes and decide how the timer is applied to the quiz (e.g., Asynchronous, Synchronous) and what happens when the time limit expires.
- Paging: You can choose to have 1 question displayed per page, 5 or 10 questions displayed, all questions displayed together, or a page break applied after each section.
- Shuffle Quiz: You can choose to have questions and sections shuffled in a quiz.
- Display: You can opt to: allow hints, hide question point values, disable email, instant messages and alerts within Brightspace.
- Header and Footer: You can format the header and footer of the quiz using an HTML editor.
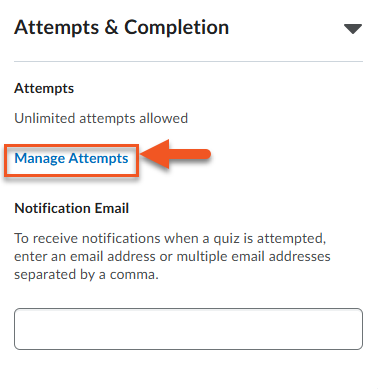
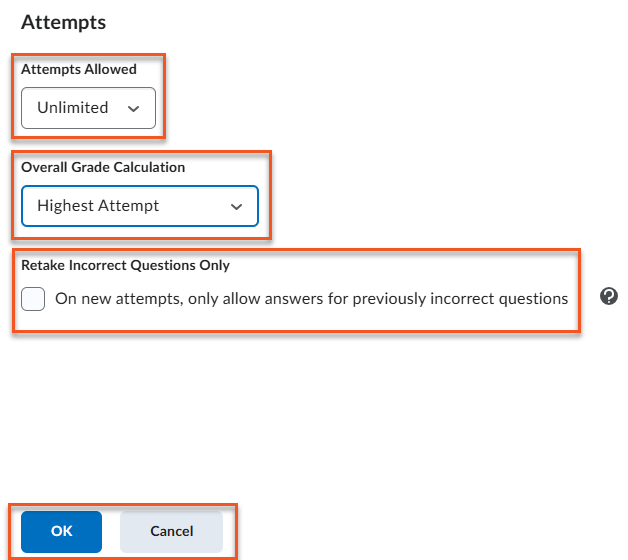
Choose how many attempts students will receive on the quiz by clicking on Manage Attempts. By default, students only get unlimited attempts at the quiz and the highest attempt is used to calculate the grade. You can adjust these settings to permit a limited number of attempts (between 1 and 10), and you can choose to use the highest, lowest, first, last or an average of all attempts to calculate the grade. You can also set the retake option to show only incorrect questions from a previous attempt.
The Evaluation and Feedback settings in a Brightspace quiz control how attempts are graded, what feedback is provided to learners, and when results are released. You can choose:
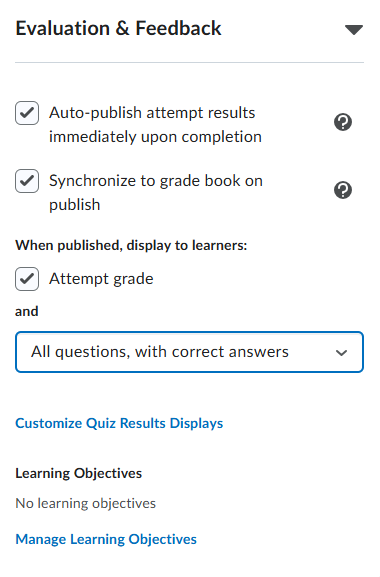
- To Auto-publish attempt results immediately upon completion, which will show students their result immediatley after they click Submit.
- To Synchronize results to grade book on publish, which will push the scores to the grade book when results are published. *NOTE: if you’ve selected to auto-publish attempt results immediately upon completion, grades will be pushed to grade book immediately upon completion. If you want to delay showing grades in the grade book, make sure this setting is off. You will then need to manually publish grades when ready.
- To display Attempt grade and selected results to learners. There are options to show:
- No questions
- Incorrect questions only, with correct answers
- Incorrect questions only, without correct answers
- All questions, with correct answers
- All questions, without correct answers
- To Customize Quiz Results Displays in order to delay students from viewing grades and results until a later date. Watch the following video that shows how to set up an Additional View.
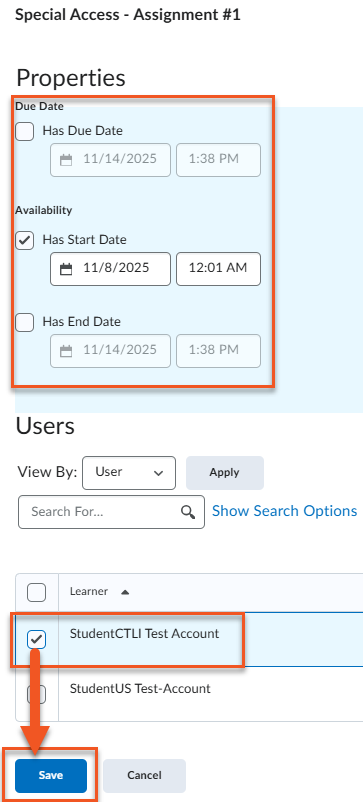
The Special Access tool allows you to accommodate students who require access outside of the assignment’s set parameters (e.g., earlier or later access, extended due date, additional attempts or time allotted). You can allow certain students to have Special Access to an assignment or only students with Special Access to access the assignment. The first case is useful if you need to provide accommodations, the second option is best used for remedial assignments.
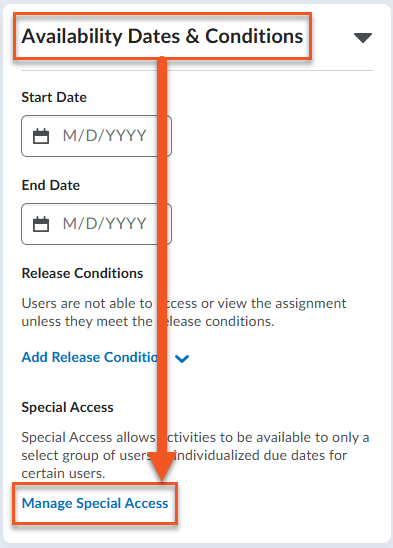
- From the Availability Dates & Conditions menu click Manage Special Access.
- From the Manage Special Access window, choose the first button to allow specific students special access. Choose the second button to allow access to ONLY students with special access.
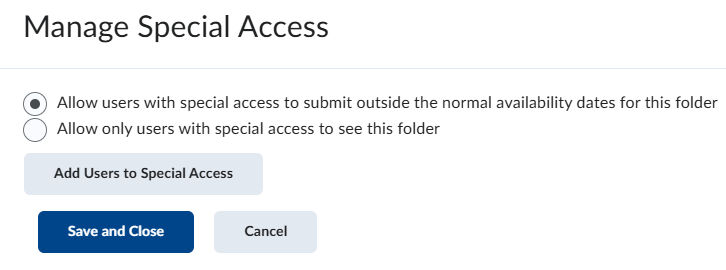
- Adjust the dates and check the box next to the student with accommodations. Click Save.
You may need to edit a quiz question during its availability or after learners have attempted it if you discover an error, unclear wording, or an incorrect answer key. When making these edits, it is important to consider how the change may affect learners who have already completed the quiz and whether grades or attempts need to be updated accordingly.
When a student runs into trouble during a quiz, instructors may need to either reopen or restore their attempt.
Reopen
Reopening a quiz attempt allows the student to resume a submitted attempt from where they left off, often used when a quiz was submitted too early or interrupted by a technical issue. Instructors can also add extra time during the reopening process before the student continues.

Restore
Restoring a quiz attempt brings back an attempt that was previously deleted, allowing the instructor to view or grade it again. The student cannot continue working on the restored attempt, it is simply recovered for record‑keeping and evaluation.
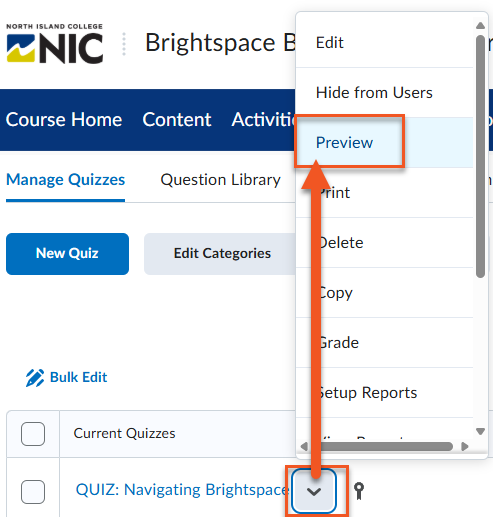
You can preview quizzes before deploying them to students. This will help you to find small errors and ensure the assessment meets your goals. In the Quiz edit window, click on ‘Preview’ OR in the ‘Manage Quizzes’ area click on the arrow next to the Quiz you’d like to preview and select ‘Preview’. To see what your students will see click ‘Start Quiz!’. When you’re finished click the ‘Exit Preview’ button in the top right-hand corner of the screen.

Quiz Tool Overview
This video is a short tour of all the features of the quiz experience and the variables and settings you can use to create and edit your quiz.