
Microsoft Teams
Overview of Teams
Create and schedule online class meetings, manage settings and controls, and assign meeting roles. Scheduling a meeting gives you the ability to adjust meeting settings before anyone joins.
*NOTE: Meet Now meetings do not have Breakout Rooms available.
You can set up either a single meeting or a series of recurring meetings. For online classes, we recommend making your meeting a series, as this generates a single link that you can share in your course outline and in your Brightspace course, making it easy for students to access.
- Open your Outlook calendar. *NOTE: This can also be done in the Teams app calendar.
- Click Teams Meeting in the menu and select Class. Class meetings by default have chat enabled only during meetings. Students can still view the chat history, but they cannot post to it outside of class time.
- Add a Title and click Make Recurring to set the meeting’s time, date and recurrence.
- *Optional: Invite students as Required Attendees if you want to preassign them to pre-created breakout rooms.
- Click to close and save. *Optional: click Send if you’re inviting students as required attendees.
- Click on the meeting in your calendar to copy the link or edit Meeting Options.
- Paste the link in your Course Outline and in your Brightspace course.
Options for Class Meetings
When you select the Class Meeting option during the scheduling process the following settings are pre-set. You can choose to adjust these settings from Meeting Options at any time.
- Only Organizer & Co-organizer can present.
- Chat is available in-meeting only (vs. Lecture meetings or Events where chat is available before and after the meeting) *NOTE: Students can still view the meeting chat, they just can’t post to it.
- The lobby is enabled with only Organizer & Co-organizer able to bypass it. *NOTE: We recommend changing this to allow only people within organization to join which enables students who have signed in to join without waiting.
To edit Meeting Options click on the meeting to open and then click on the cog wheel. The Meeting options window will pop up, and you can customize meeting options like who can bypass the lobby, who an present, what roles participants are assigned, etc.

Meeting Controls
See the chart below to see what various settings and controls do in Teams.
|
Teams Icon |
What it does |
|---|---|
 |
Click on the microphone icon to mute or unmute your microphone. Click the small arrow to the right of the icon to access your sound settings. |
 |
Click on the camera icon to turn your camera on or off. Click on the small arrow to the right of the icon to access your camera settings. |
 |
Opens the participants pane where you can see and manage the people in your meeting. Click on the participant’s name and select Make Presenter to grant sharing permissions. |
 |
Opens the meeting chat. Two key differences to know about chat in Teams are that chat can be viewed outside the meeting by anyone who was in the meeting and has a Teams account, and that all messages in the Teams chat are visible to everyone in the meeting. To privately message someone in Teams you must open a chat with them separately from the meeting chat. |
 |
Allows you to access the options for sharing your screen or cloud-hosted files with everyone in the meeting. |
 |
Click More to access the record function. In Teams you can choose to capture only a written transcript or to record the video and audio of the meeting. You can also toggle display of automatically generated captions from here. Anyone in Teams can turn on captions for themselves. |
  |
Allows you to access apps like Polls where you can create and launch polls and quizzes in your meeting. |
 |
Attendees can use emojis to give a quick reaction during the meeting. You will see the emojis displayed over their tile in the gallery view. |
  |
Share an interactive whiteboard for in-meeting collaboration. *NOTE: Microsoft Whiteboard is only available for people who are logged in to a NIC Teams account. If you are working with external guests you will want to use a different method for collaboration. |
 |
Create and manage breakout rooms. |
 |
Adjust what you see in the meeting. Individual attendees can adjust their view to something different than what the organizer chose if desired. |
 |
Click Leave to leave the meeting or click the arrow on the right end of the button and choose End Meeting to end the meeting for everyone. |
Meeting Roles
In Teams the person who schedules the meeting is the Organizer. You can add Co-organizers to assist with managing the meeting.
Organizers and Co-organizers can:
- Manage meeting attendees, including promoting and demoting presenters, muting microphones and cameras
- Manage breakout rooms and other meeting options
There is also a Presenter and an Attendee role. Presenter is a default role for everyone in a teams meeting unless you edit your meeting settings. However, in Class meetings the default is set to add everyone as Attendees.
Presenters can:
- Mute the microphone and turn off the camera of other presenters and attendees
- Promote/demote attendees and presenters
- Presenters with accounts can admit users from the Lobby for the meeting
See the chart below to see what permissions the individual roles have.
| Organizer | Presenter | Attendee | |
|---|---|---|---|
| Speak and share video | x | x | x |
| Participate in meeting chat | x | x | x |
| Share screen | x | ||
| Privately view a PowerPoint file shared by someone else | x | x | x |
| Take control of someone else’s PowerPoint presentation | x | x | |
| Mute other participants | x | x | |
| Prevent attendees from unmuting themselves | x | x | |
| Remove participants | x | x | |
| Admit people from the lobby | x | x | |
| Change the roles of other participants | x | x | |
| Start or stop recording | x | x | |
| Start or stop live transcription | x | x | |
| Manage breakout rooms | x | ||
| Change meeting options | x |
Additional Resources
If you’re looking to dive right into learning more, Microsoft offers a range of training resources including video tutorials and documentation.
Teaching in Teams
See the accordion below to learn more about Teams features that can be used for instruction and collaboration (Chat, Screen Sharing, Whiteboard, Breakout Rooms).
Main Chat
Meeting attendees, presenters and organizers can use the Chat in a meeting to send messages to everyone. There is no option for private messages within the meeting chat in Teams. All messages in chat will be visible to everyone in the chat. *NOTE: Class meetings by default have chat enabled only during meetings. Students can still view the chat history, but they cannot post to it outside of class time.
- Click on the Chat button in the meeting control bar to open the chat pane.
- Type your message in the box provided and press enter or click the send button to share it with everyone in the meeting. You can also use the buttons below the text area to access formatting, attach a file and more.
*NOTE: Only people on the NIC Teams license can upload files or access files uploaded by others. If you have a guest speaker or external person who will be joining your class sessions, consider using email or a shared folder in One Drive rather than the Teams meeting chat to share files with that person. You will need to generate a link that is visible to “Anyone” in order to share a file link in Teams chat and have external people see it.
Q&A Chat
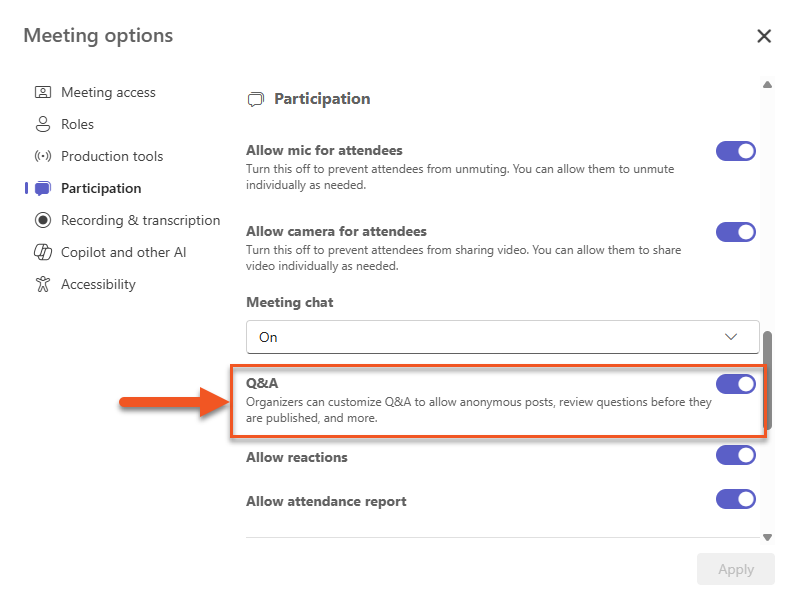
In the meeting options, you have the ability to enable a second chat stream called Q&A. The Q&A feature keeps participant questions organized in a separate space from the main chat, making it easier for presenters to track and respond to them. To enable this feature toggle it on in the Meeting Options.
Microsoft Teams offers several ways to share content with meeting participants. Some features are tied to a user’s NIC account and may not be available to guests or external participants who join without signing in. This can affect what guest speakers or other external attendees are able to access during a session. If you have questions about inviting guest speakers or working with external participants, please submit a Service Desk Request to CTLI.
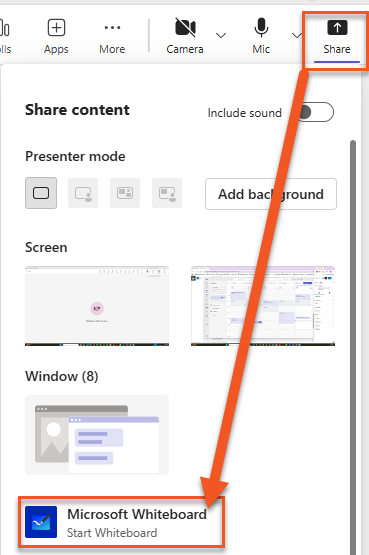
- Click Share.
- Choose a Presenter Mode. *NOTE: The default is content only but you can also choose between three options to show your video tile along with your shared content.
- Select the screen you want to share to share everything happening on that screen. To share a specific window, click the image under the Windows heading and then click on the window you want to share.
- When you are done sharing click End Share
PowerPoint Live allows you to upload a PowerPoint presentation into Teams to create a more interactive presentation mode for you and your students. When you present using PowerPoint live, you see the Presenter View in PowerPoint which includes any notes you have added to your slide and PowerPoint annotation options.
Attendees viewing a PowerPoint Live slide deck have additional controls available to them including the ability to navigate through slides at their own pace, to convert slides to high contrast to improve accessibility, and to translate the slides to another language. If an attendee moves to a different slide than what you are presenting they will see a Sync to Presenter button which jumps them to the slide you’re currently sharing.
- Click on Share.
- Select a PowerPoint from those listed or scroll down to Browse OneDrive or Browse My Computer and find your presentation where it is saved on your computer or OneDrive.
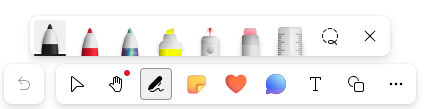
- You will see presenter mode of your PowerPoint including built in PowerPoint annotation options such as the laser pointer, a marker and a highlighter as well as any notes you have added to your slides. *NOTE: Attendees will only see the shared slide and any annotations you add, they will not see your notes.
- When you are done, click Stop Sharing
When sharing a video in Microsoft Teams, you can use Share screen to play videos from a website or a Brightspace course, just make sure to enable Include sound for clear audio.
For a smoother experience, consider embedding videos in Microsoft PowerPoint and presenting with PowerPoint Live, which allows you to organize and play videos sequentially like a playlist.
Follow the steps below to embed a video on a PowerPoint slide
- Go to the slide where you want the video.
- Select the Insert tab.
- Click Video and choose This Device (for a file) or Online Video (for a web link).
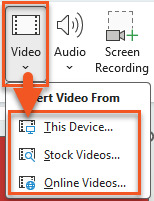
- Select your video or paste the URL, then click Insert.
- Resize and position the video on the slide as needed.
- Use the Playback tab to set how it starts (e.g., On Click or Automatically) and adjust settings like trimming or volume.

- Hover over the You’re Sharing Your Screen text at the top of your screen.
- Click Annotate on the screen share toolbar.
- Select the annotation tool you want from the toolbar that appears.
- When you are done sharing your screen, click Annotate again to toggle off annotations.
The Whiteboard feature in Microsoft Teams provides a shared digital canvas where participants can draw, write, and add ideas in real time during a meeting. You can access it by selecting Share and choosing Microsoft Whiteboard from the meeting controls. You will be prompted to allow everyone to edit or to present the whiteboard where only you can edit.

Whiteboard includes tools like pens and highlighters for drawing, sticky notes, text boxes, shapes, and templates for activities like brainstorming or planning. It also supports real-time collaboration, so everyone in the meeting can contribute at the same time.
You can set up Breakout Rooms in advance of a meeting or create them once the meeting begins. If attendees are formally invited (rather than joining via a link), you can also pre-assign them to breakout rooms before the meeting starts. For recurring meetings, the breakout room setup will persist unless it’s changed or deleted, so you typically only need to configure it once.
Remember, the option to create and pre-assign participants to Breakout Rooms is only available if you’ve added attendees using the email address associated with their NIC account when scheduling the meeting. *NOTE: You can only access Breakout Room setup from Teams, you cannot manage Breakout Rooms from Outlook.
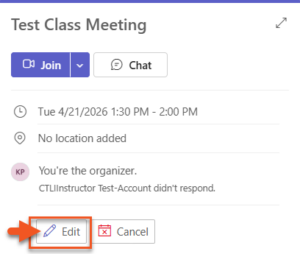
- Go to Teams calendar and open the meeting invite by double clicking on it or click once and then select Edit.
- Select the 3 dots for More Options > Breakout Rooms from the top menu bar. (This option will only appear after invites have been sent to attendees)
- Select Create Rooms.
- Choose the number of rooms you want (up to 50) and select Add rooms.
- Select Assign participants.
- Choose how participants are assigned (automatically, manually, or user’s choice) and select Next.
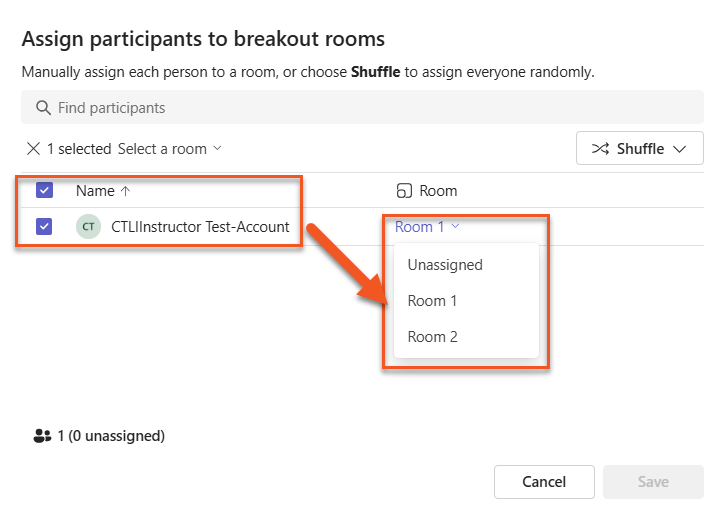
- If you’ve invited attendees using their NIC email address, you can pre-assign them to rooms by clicking Assign participants. Check the box next to the participant and choose a room from the dropdown menu and click Save.
You can rename, change settings, or delete a room using the three dots on the room card.
When you launch a meeting you can immediately set up Breakout Rooms even if none of your attendees have joined yet. You must be joining the meeting on a computer using the Teams app in order to manage Breakout Rooms.
- Launch the meeting by link or by clicking the Join button.
- Click the Rooms button in the meeting control bar.
- Choose how many rooms you want to create.
- Select whether you want to assign people Automatically or Manually.
*NOTE: Room assignment is only automatic if you create the room when participants are already in the meeting. If people join a meeting after you have set up rooms you will need to assign them to a room. - Click Create Rooms. It may take a few seconds to create your rooms, once they are created you will see the Breakout Rooms pane with an Assign participants button along with other controls (add a room, send an announcement, delete, and settings).
- If participants haven’t been auto-assigned, Assign participants.
- Open Rooms when ready.
Once all of your attendees are in your meeting, you can assign them to breakout rooms. Breakout rooms won’t open until you choose to open them so you can assign members to their rooms at any time.
- Click the Rooms tab on the menu at the top.
- Click Assign Participants.
- Choose from the options available:
Bulk Assign
Participants to Room
- Check box next to each person you want to assign or check the top box to select everyone
- Choose a room from the drop down menu
- Click Save
Manually Assign Single Participant to Room
- Click the drop down for the participant in the Rooms column
- Select room you want to put that person in
- When you are done connecting people to their groups, click Save
Randomly Assign Unassigned
Participants to Room
- Click Shuffle
- Select Only Unassigned People
- Anyone not previously assigned to a room will be randomly assigned until all participants are distributed evenly
- Click Save
Randomly Assign all Participants to Room
- Click Shuffle
- Select Everyone
- Everyone will be assigned randomly to a room, this may or may not be the same room they were in previously
- Click Save
- Once you have assigned all participants the Assign Participants button will be grey and you will see the purple Open button. Click this when you are ready to open the Breakout Rooms
Additional Resources
If you’re looking to dive right into learning more, Microsoft offers a range of training resources including video tutorials and documentation.
Record Teams Meetings
When teaching online in Microsoft Teams, you can use the Record and Transcribe feature to capture audio or audio and video of your lecture and provide students with a transcript. Recording sessions helps support learning by allowing students to revisit complex concepts, review material at their own pace, and catch anything they may have missed in real time. It also improves accessibility by giving students a searchable transcript they can refer to throughout the course.
Record meetings in Microsoft Teams, then upload the recording from OneDrive to Kaltura My Media to share with students. Teams recordings are available for 120 days before they are automatically removed, so be sure to download and upload them within that timeframe.
Additional Resources
If you’re looking to dive right into learning more, Microsoft offers a range of training resources including video tutorials and documentation.
Using Teams for Virtual Office Hours
It’s recommended to schedule a separate recurring meeting in Microsoft Teams to create a dedicated link outside of your regular class session. Keep in mind that the meeting chat persists, meaning anyone who has ever been invited to or participated in the meeting can continue to access past messages, shared files, and recordings.
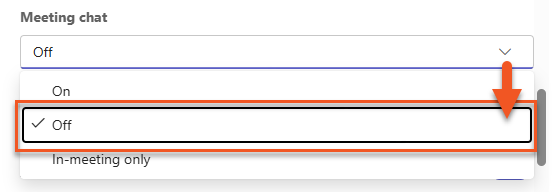
For this reason, avoid posting confidential documents (such as accommodation letters) in the chat. You may want to disable the meeting chat altogether and ask students to share sensitive information via email instead.
Additional Resources
If you’re looking to dive right into learning more, Microsoft offers a range of training resources including video tutorials and documentation.
Invite Guest Speakers
To invite a guest speaker, simply add them to your meeting invite as an attendee or share the meeting link with them. When using Microsoft Teams, keep in mind that external participants will not be able to join breakout rooms.
To support a smoother experience, you may want to assign the guest speaker the Presenter role in advance and enable the Green Room feature. The Green Room creates a private space where organizers and presenters, including external guests, can join before the meeting starts. This allows time to test audio and video, review any final details, and ensure everything is ready before admitting participants into the main session.
Additional Resources
If you’re looking to dive right into learning more, Microsoft offers a range of training resources including video tutorials and documentation.
Accessibility in Teams
Explore accessibility principles and how Teams supports diverse learner needs. Teams comes with built in accessibility features including:
- Automatic captioning of meetings that everyone in the meeting can choose to toggle on or off
- Transcripts for recorded meetings
- PowerPoint Live which can allow attendees to control which slides they focus on and makes shared slides readable by screen readers*
- The ability of the Organizer or attendees to pin a person’s video to make it easier to focus when multiple people have their cameras turned on
*In order to allow those who rely on a screen reader to access your PowerPoint the presentation needs to be accessible.
Additional Resources
If you’re looking to dive right into learning more, Microsoft offers a range of training resources including video tutorials and documentation.